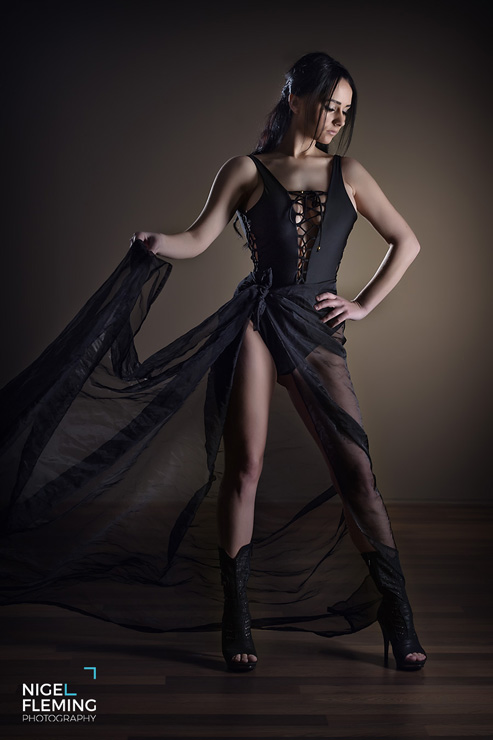
This photo was captured yesterday (19th January 2017) in my studio with model, Ernesta. It seemed to attract quite a few likes and comments on Facebook, so I thought I would share how I set this up.
Firstly, this was an evolving process of trying different positions, mainly with the black material until we reached the point shown in the final photo above. While I had a clear vision of what I wanted to achieve, like almost all final photos, it just didn’t happen straight off on the first take.
The material was a piece of very inexpensive black voile material which I think I got from Ikea a number of years back. I asked Ernesta our model to bring along a black one piece to the photo shoot with this photo in mind.
The main shape to the black material was achieved by using a fan to blow on it. This was where a bit of experimentation and repositioning of the fan a few times was needed. When I saw the photo above on the back of the camera I knew we had got it right and I did a series of shots after that.
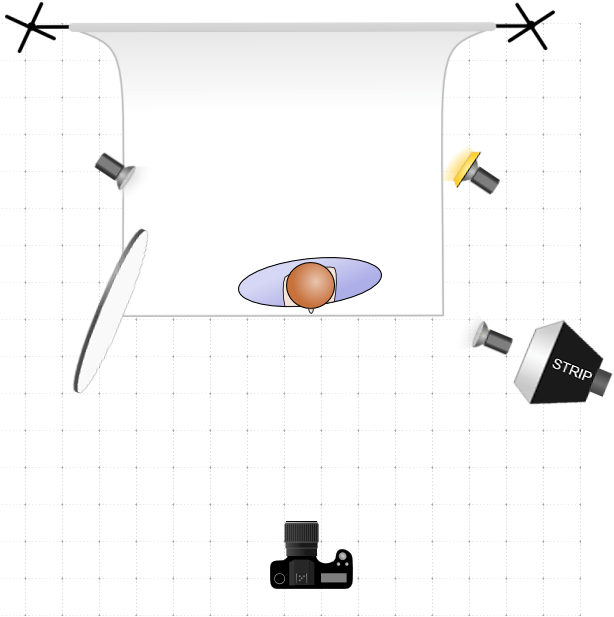
From a lighting point of view this was a four light setup – lighting diagram below.
I used a mix of hard light and soft light on the model. I positioned a hard light above and down to camera right. This hard light was a standard studio 7″ reflector dish with a medium honeycomb grid fitted. This gave me a ‘spotlight’ of hard light on the models face and uppermost body area. Below this was in total darkness.
To take up the slack in lighting the rest of the model from upper body downwards, I placed a strip soft box directly under the hard light, and on the same axis. Importantly I feathered this light upward to prevent it illuminating the floor area too much. The model’s right leg and arm needed to be posed deliberately to catch this narrow strip of light. The right leg (left as you look at the photo) shows the fall off of light which is typical of that from a soft light source.
I placed a large white reflector on the opposite side to these lights, to fill a little on the shadow side.
A back light was placed behind the model on camera left. This was a hard light with a standard 7″ reflector dish with a honeycomb grid fitted. This created a rim light on the shadow side. It can be best seen on the model’s outside right upper arm, and inside lower left arm.
The final light was a background light. This was a small gridded beauty dish with a neutral/complimentary coloured gel onto a grey wall.
Here’s a lighting diagram…